


SharePoint is a go-to tool for over 200 million users, offering a wide range of features for collaboration and productivity. One of its many uses is setting up a ticketing system, which can help streamline both customer service and internal support.
In this guide, we will explore how you can use SharePoint to create a ticketing system that not only boosts efficiency but also enhances the overall experience for your users.
What is a SharePoint Ticketing System?
A SharePoint ticketing system is a tool built on the SharePoint platform to manage and track support requests, inquiries, or issues reported by users or customers.
It’s a centralized system that helps organizations streamline their support processes, ensuring that each request is logged, categorized, prioritized, and assigned to the appropriate team or individual for resolution.
In a SharePoint ticketing system, users can submit tickets through various channels, such as forms, email, or directly within SharePoint.
Each ticket contains essential information, including a description of the issue, its priority level, the requester’s details, and any relevant attachments.
Steps to Set up Your SharePoint Helpdesk
Creating a helpdesk in SharePoint involves setting up a system for managing and tracking support tickets. Here’s a step-by-step guide to help you get started:
1. Create a SharePoint site
If you don’t already have one, create a new SharePoint site for your helpdesk. This will serve as the central hub for your support system
2. Set up a Ticket List
Creating one in SharePoint is easier than you might think, and it won’t take much time.
To get started, follow these steps:
1. In your SharePoint site, click the “New” button where you want to set up the ticketing system.
2. Choose the “List” option from the settings.
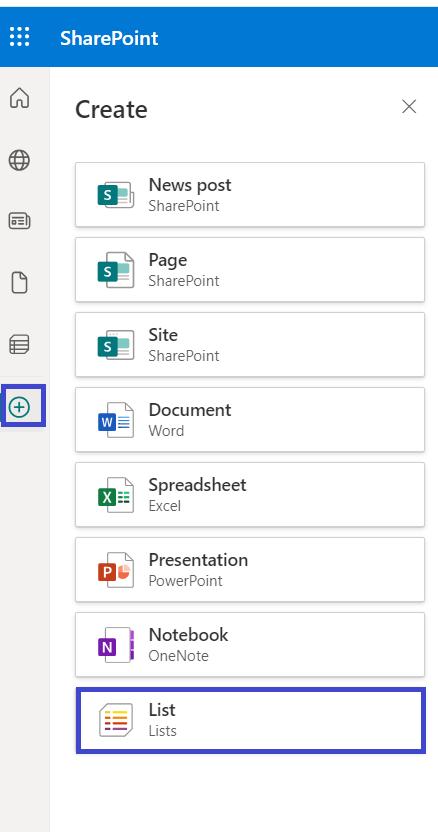
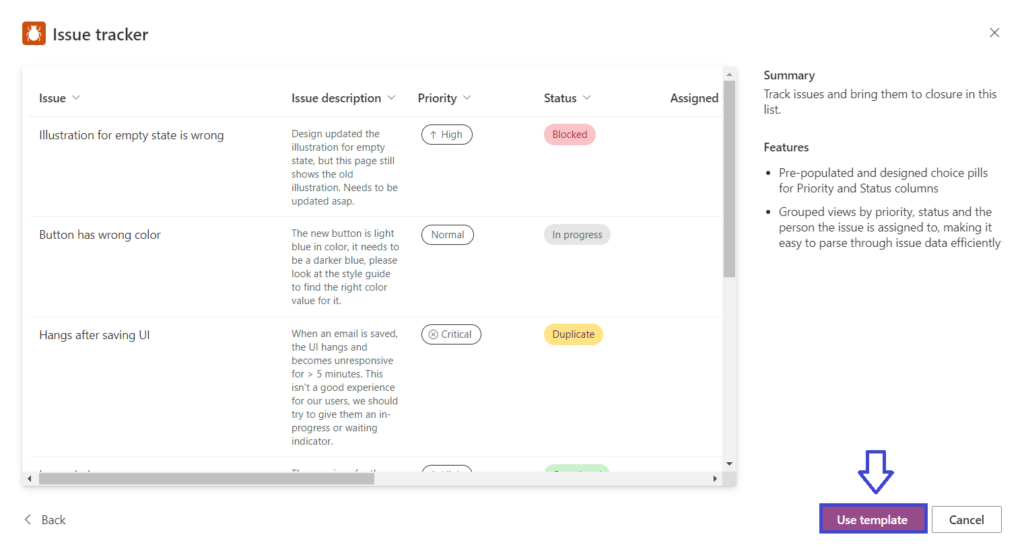
3. In the window that opens, you’ll see various buttons for creating a list.
4. From the list of templates, select “Issue tracker.”
5. On the preview page, click the “Use template” button.
3. Customize the Ticket Form
Use SharePoint’s form customization options or Power Apps to design a user-friendly form for submitting and updating tickets.
4. Set up Views
Create different views for your ticket list to help organize and filter tickets based on criteria such as status, priority, or assigned staff member.
5. Implement Workflows
Use Power Automate to create workflows that automate common tasks, such as:
- Sending notifications to support staff when a new ticket is created or updated.
- Escalating tickets that are not addressed within a certain timeframe.
- Updating ticket status when certain conditions are met.
6. Configure Permissions
Set up appropriate permissions to ensure that users can submit tickets and view their tickets, while support staff can access and manage all tickets.
By following these steps, you can create a basic helpdesk system in SharePoint that helps you manage and track support tickets efficiently. You can further customize and enhance the system based on your organization’s specific needs and requirements.
Explore Cloud-Based Ticketing Systems!
If you’re thinking about taking the route of using SharePoint’s built-in features for your ticketing system, here are a few things to consider:
- The outcome will be basic. You’ll have a functional system that won’t be packed with advanced features.
- If you’re working with a limited budget and need a ticketing system as soon as possible, this approach is a good starting point.
A ready-to-use ticketing system can be a great choice for those who are short on time or have some budget flexibility. These options are designed to be user-friendly and can save you the effort of setting up and customizing a system from scratch.
Going for a pre-built ticketing platform lets you quickly implement a ticketing system that fits your needs without the hassle of building one yourself.
You can consider Desk365, a helpdesk ticketing system offering a comprehensive set of features starting at just $12. It’s an affordable and effective solution that can meet your ticketing system needs without breaking the bank.
Omni-Channel
- Microsoft Teams Ticketing
- Email Ticketing
- Customer Support Portal
- Web Form/Web Widget
- Unified Inbox
Process Automation
- Workflow Automation
- Multiple Business Hours
- Custom Response Templates
- Canned Responses
- Tasks/To-do Lists
- 'Share To' Tickets
- Time Tracking
- SLA Management & Business Hours
- SLA Reminders & Escalations
- Multiple SLAs
- SLAs in Automations
Ticket Management
- Change/Approval Management
- Round Robin Ticket Assignments
- Load Based Ticket Assignments
- Ticket Watchers
- Multiple Groups/Departments
- Draft with AI
- AI Agent
- Collision Detection
- Closure Rules
- Knowledge Base
Data & Analytics
- Customer Surveys & Reports
- Ticket Trend Reports
- Productivity/SLA Reports
- Export Data
- Scheduled Reports
- Import Data
Customization
- Custom Email Servers
- Custom Domain
- Custom Ticket Fields
- Custom Forms
- Custom Roles
- Custom Reports & Graphs
- Remove Desk365 Branding
Integrations
- Entra ID Single Sign-on
- Microsoft Entra ID Sync
- API Access
- Web-hooks
- Power Automate Connector
- Microsoft 365 Copilot Plugin
Support
- Free Setup and Installation
- Priority Support
Switch to Desk365 now, starting at just $12!
What are the Benefits of Using SharePoint for Helpdesk
Utilizing SharePoint for a helpdesk system offers several advantages:
1. Centralized Information Management
SharePoint provides a single platform for storing and managing all helpdesk-related information, including tickets, solutions, and knowledge base articles. This centralization makes it easier for support teams to access and share information.
2. Customization and Scalability
SharePoint’s customizable nature allows organizations to tailor their helpdesk to meet specific needs. As the organization grows, the helpdesk can easily be scaled to accommodate increased demand.
3. Integrated Collaboration Tools
SharePoint integrates seamlessly with other Microsoft tools like Teams and Outlook, facilitating better communication and collaboration among support team members. This integration enhances the team’s productivity and streamlines workflows within Microsoft Office 365.
4. Automated Workflows
SharePoint’s workflow capabilities enable the automation of common helpdesk processes, such as ticket routing and escalation, reducing manual effort and improving customer response times.
5. Enhanced Security
SharePoint offers robust security features, including access controls and data encryption, ensuring sensitive helpdesk information is protected.
6. Reporting and Analytics
With SharePoint, organizations can generate detailed reports and analytics on helpdesk performance, helping identify trends, areas for improvement, and overall service effectiveness.
By leveraging SharePoint for the help desk, organizations can improve their support services’ efficiency, responsiveness, and quality, ultimately enhancing user satisfaction and productivity.
How to Enhance Your SharePoint Ticketing System?
Here are some ways to enhance your SharePoint ticketing system:
1. Integrating Email Support
Email integration is a crucial feature for any helpdesk system, as it allows users to submit and track tickets via email.
In SharePoint, you can achieve this by setting up an incoming email feature for your ticket list. This allows users to send emails to a specific address, and the emails are automatically converted into tickets in your list.
To set up email integration, you’ll need to configure the incoming email settings in your SharePoint list.
This involves specifying an email address for the list and choosing how emails are stored and displayed. Once configured, any emails sent to the designated address will be automatically added as items in your ticket list, complete with the sender’s details and the email content.
Adding an email ticketing system can further streamline this process, offering a more centralized and efficient way to handle support requests. By integrating such a system, you can enhance your helpdesk’s functionality, making it even easier for users to get the help they need.
2. Adding a Knowledge Base
A knowledge base is an essential component of a helpdesk system, providing users with self-service resources to resolve common issues. In SharePoint, you can create a knowledge base by setting up a separate site or list dedicated to articles, FAQs, and troubleshooting guides.
Start by creating a new site or list for your knowledge base. Populate it with articles and resources that cover common issues and solutions. Organize the content into categories for easy navigation and use tags or keywords to make it searchable.
To enhance the effectiveness of your knowledge base, consider integrating it with your ticketing system. This way, users can easily access relevant articles when submitting a ticket, and support agents can reference and link to articles when responding to tickets.
Recommended Reading – How to Set Up Knowledge Base in Microsoft Teams?
3. Implementing Chatbots for Quick Assistance
Chatbots are becoming increasingly popular in helpdesk systems, offering instant assistance to users and reducing the workload on support agents. In SharePoint, you can integrate chatbots using services like Microsoft Power Virtual Agents or third-party bot platforms.
To implement a chatbot, start by creating the bot using your chosen platform. Define the bot’s conversation flows and responses, focusing on common issues and questions that users might have. Once your bot is ready, embed it into your SharePoint helpdesk site using a web part or iframe.
The chatbot can be programmed to handle simple queries, provide quick solutions, and even create tickets on behalf of users. For more complex issues, the bot can escalate the conversation to a human agent.
Recommended Reading – Enhance SharePoint Experience by Adding a Web Widget to a SharePoint Site
How to Manage Tickets and Workflows?
Managing tickets and workflows effectively is crucial for maintaining efficient operations and ensuring customer satisfaction. Here are some steps to help you manage tickets and workflows:
Tracking and Assigning Tickets
Effective ticket tracking and assignment are crucial for a well-functioning helpdesk. In SharePoint, you can use views and filters to keep track of tickets.
Create different views for open, in-progress, and closed tickets to quickly see the status of all requests. Additionally, use filters to display tickets assigned to specific agents or within certain categories.
Automate the assignment process using Power Automate workflows. For example, you can create a workflow that assigns tickets to agents based on their expertise or current workload.
This ensures that tickets are handled by the most suitable team member and helps distribute the workload evenly.
Automating Escalation and Resolution Processes
To ensure timely resolution of issues, set up automated escalation processes. For instance, if a ticket remains unresolved for a certain period, it can be escalated to a higher-level support team or flagged for urgent attention.
This can be achieved through Power Automate by setting conditions that trigger escalation actions when specific criteria are met.
Similarly, automate the resolution process by creating workflows that update the ticket status and notify the relevant parties when an issue is resolved. This keeps everyone informed and ensures that tickets are closed promptly.
Is a SharePoint Helpdesk Ticketing System the Right Choice?
Is a SharePoint helpdesk ticketing system sufficient for your needs? While SharePoint can be utilized to construct a rudimentary ticketing system, developing a comprehensive SharePoint helpdesk ticketing system in-house may fall short when compared to specialized ticketing systems or helpdesk software.
Here are some potential limitations you might face with a SharePoint-based ticketing system:
1. Limited automation capabilities
2. Absence of a built-in knowledge base
3. Restricted reporting and analytics
4. Complex customer portal creation
5. Integration challenges
6. Scalability concerns
7. Limited availability of third-party add-ons
In summary, SharePoint can provide a basic ticketing system for some organizations, but if you need advanced features, extensive automation, robust reporting, and a dedicated customer portal, building your own SharePoint helpdesk ticketing system might not be the best option.
In these situations, investing in a dedicated ticketing or helpdesk solution like Desk365 is usually more efficient, specifically designed to manage tickets and customer support effectively.
Book a demo with Desk365 and discover how it enhances your customer support experience.