


You know that set of tasks you do every single day without thinking? Saving email attachments to the right folder. Copying form responses into a spreadsheet. Pinging a Teams channel every time something needs approval. Sending the same onboarding email to every new hire. None of it is hard. It’s just repetitive, and it quietly eats hours out of your week that you’ll never get back.
That’s exactly the kind of work Microsoft Power Automate is built to take off your plate. It’s a cloud-based tool from Microsoft that lets you automate repetitive tasks and connect the apps you already use, like Outlook, SharePoint, Excel, and Teams, without writing a single line of code. You build simple “when this happens, do that” rules using a visual drag-and-drop interface, and Power Automate handles the busywork in the background.
The best part: if your organization already has a Microsoft 365 subscription, you likely have access to it right now and don’t even realize it.
In this beginner’s guide, we’ll walk through everything you need to get started. What Power Automate is and how it works, the different types of flows, real use cases across industries, how to build your first flow step by step, what it costs in 2026, and the drawbacks worth knowing before you dive in. By the end, you’ll have everything you need to start automating your own workflows and free up time for the work that actually matters.
What is Microsoft Power Automate?
Microsoft Power Automate is a tool that helps people and businesses automate repetitive tasks and workflows without needing to write code. Imagine you keep getting emails with attachments that you need to save to a folder. Power Automate can do that for you, automatically, every time.
It works by connecting different apps and services (like Outlook, SharePoint, Excel, Teams, etc.) and letting you set up rules for how things should flow. For example:
When a new file is added to a OneDrive folder, send a message in Teams.
If a form is filled out, copy the data into an Excel sheet.
Get an alert on your phone when someone posts in a specific channel.
It’s designed to save time, reduce human error, and help you focus on more important work. You can build these automations using a visual, drag-and-drop interface, so even people without a technical background can use it.
Power Automate leverages connectors to interconnect applications and facilitates communication and task execution. With a vast collection of over 1000+ connectors and more, and with the list constantly expanding, you have the flexibility to integrate with a diverse range of popular tools and services that you will be using in your day-to-day lives.
It is part of the Microsoft Power Platform and works seamlessly with other Microsoft products such as SharePoint, OneDrive, Teams, Power BI, and Dynamics 365 and is available to all users who hold an Office 365 license.
It is available on desktop, and you can also download and use the Power Automate mobile app for Android and iOS
With its wide range of capabilities, Power Automate can help organizations increase efficiency, reduce errors, and improve collaboration.
What are some common use-cases of Power Automate?
Microsoft Power Automate has a wide range of use cases and can be applied to many different industries and scenarios. Some common examples include:
Automating repetitive tasks
Power Automate streamlines everyday tasks by automating repetitive processes, freeing up time and increasing efficiency.
For example, tasks such as sending emails, copying and pasting data, updating data in Excel, uploading attachments in OneDrive, automating data entry, and more can be done effortlessly.
Streamlining workflows and processes
Power Automate optimizes and simplifies workflows and processes by providing seamless integration and automation capabilities, resulting in increased agent productivity and efficiency.
For example, tasks such as approvals, project management, document management, and more.
Sending notifications and alerts
Power Automate facilitates timely communication by sending automated notifications and alerts, ensuring important information is never missed or overlooked.
For example, tasks such as customer service automation, reminders, updates, escalations, tracking brand’s social media mentions, and much more.
Synchronizing data between different systems
Power Automate can also be used to synchronize files between different applications. It eliminates manual data entry and ensures data accuracy by seamlessly synchronizing data between different systems and applications, saving time and reducing the risk of errors.
For example, when a new customer signs up for your product, create a record in your CRM and send them a welcome email.
Automating HR processes
Power Automate can streamline HR processes by automating tasks such as onboarding, benefits enrollment, time off requests, and performance evaluations, increasing efficiency and improving the employee experience.
For example, setting up a flow to automatically send an email to new hires with all the necessary onboarding information and documents, reducing the manual effort required by HR staff and facilitating a wonderful onboarding experience for new employees.
By leveraging Power Automate workflows, businesses can save time, reduce errors, and improve productivity across various areas of their operations.
Which industries can benefit by using Power Automate?
Power Automate is a tool that can be used by businesses of all sizes and industries. Let’s explore which industries can benefit the most from using Power Automate.
Healthcare
Power Automate can revolutionize the Healthcare industry by automating tasks such as patient scheduling, appointment reminders, billing, lab result notifications, patient record updates, medication reminders, and more enhancing the quality of patient care and improving overall operational efficiency.
Education
It can transform the Education industry by automating administrative tasks such as class schedules, grading, and student attendance tracking, freeing up time for teachers and improving the student experience.
Finance
Power Automate can enhance the Finance industry by automating tasks such as invoicing, payment processing, financial reporting, and expense reporting, streamlining financial operations and increasing efficiency. It can also be used to integrate different systems, such as accounting systems and billing systems.
Technology
Power Automate can be used to automate various processes, such as software testing, deployment, and incident management. It can also be used to integrate different systems, such as help desk systems and project management tools. This can help to streamline the IT process, making it a valuable tool for the technology industry.
Retail
The retail industry can greatly benefit from using Power Automate. Power Automate can be used to automate various processes, such as inventory management, order fulfillment, and customer service. It can also be used to integrate different systems, such as point of sale (POS) systems and customer relationship management (CRM) systems. This can help to streamline the retail process, reduce errors, and increase efficiency.
Manufacturing
It has the potential to boost the productivity of the manufacturing industry in several ways, including inventory management, production scheduling, and quality control. By automating these tasks, it can improve supply chain management and provide real-time updates based on production data, ultimately leading to increased efficiency and cost savings.
Marketing
Power Automate can be used to automate various processes, such as email marketing campaigns, lead management, and social media management. It can also be used to integrate different systems, such as marketing automation tools and customer relationship management (CRM) systems. This can help to streamline the marketing process, reduce errors, and increase efficiency.
Government
Microsoft Power Automate can also help the government in improving efficiency in areas such as budget management, procurement, and citizen services. For example, Power Automate can be used to automate the process of citizen service requests, allowing for faster customer response times and improved citizen satisfaction.
Power Automate is a versatile tool that can be used by businesses across various industries to automate their processes, integrate systems, reduce errors, and increase efficiency. These are just some of the industries that can benefit from using Power Automate.
Discover various real-world examples shared by Microsoft on this link. Enjoy browsing through these case studies to learn how Power Automate is making a difference for businesses all over the world.
How does Microsoft Power Automate work?
Microsoft Power Automate simplifies processes and tasks by generating automated workflows, called flows, that enhance operational efficiency.
Users can easily create workflows through a highly visual and user-friendly drag-and-drop interface. These workflows can then be triggered by specific events or conditions.
Power Automate operates on the principle of triggers and actions.
A trigger initiates a workflow, for instance, receiving an email in your Outlook account. An action is the subsequent step that takes place once the trigger has been activated, like posting the Outlook message on Microsoft Teams or Slack.
Workflows can consist of one or more actions. Users have the option to either create a new flow from scratch or choose from pre-existing templates.
In addition to the powerful automation capabilities of Microsoft Power Automate, the integration of Copilot can take your workflow automation to the next level.
Copilot, powered by AI, assists in creating more efficient and intelligent flows, enabling you to automate complex tasks with ease. By leveraging Copilot’s suggestions, you can optimize your processes and ensure that your automation is aligned with best practices, ultimately enhancing your overall productivity.
Read more – How to use Microsoft Copilot in Power Automate?
What are the Power Automate flow types?
Microsoft Power Automate provides three types of flows based on how the flow is created. They are cloud flows, desktop flows, and business process flows.
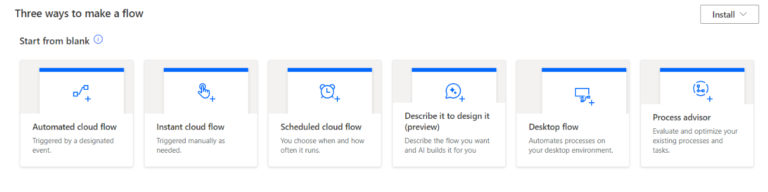
Cloud flows
Cloud flows are created when you want your automation function to be triggered either automatically, instantly, or via a schedule. Under cloud flows, it is possible to create three different types of flows.
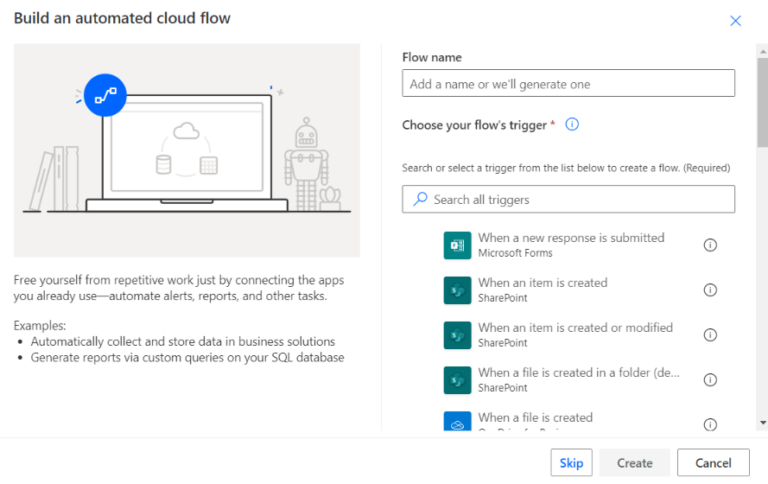
Automated cloud flows
With automated cloud flows, you can create an automation triggered by any specific event defined by the user.
For example, when a new email is received in your Outlook inbox, any attachments that come with it could automatically be downloaded and saved to a specified folder in your OneDrive account, thereby removing the need for you to manually download and save each attachment.
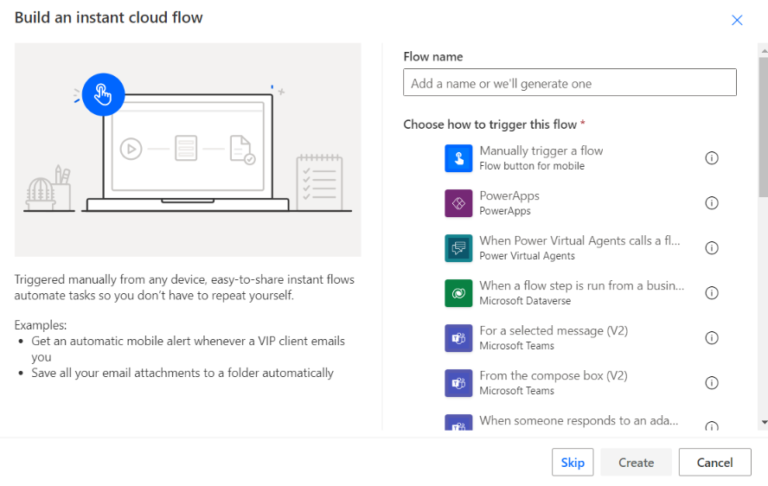
Instant cloud flows
With instant cloud flows, you can start an automation with a click of a button. These flows can be triggered manually from either a mobile device or computer, allowing for convenient automation when required.
For instance, you could use instant cloud flows to send a reminder to your sales team regarding an important prospect’s trial that is due to end soon.
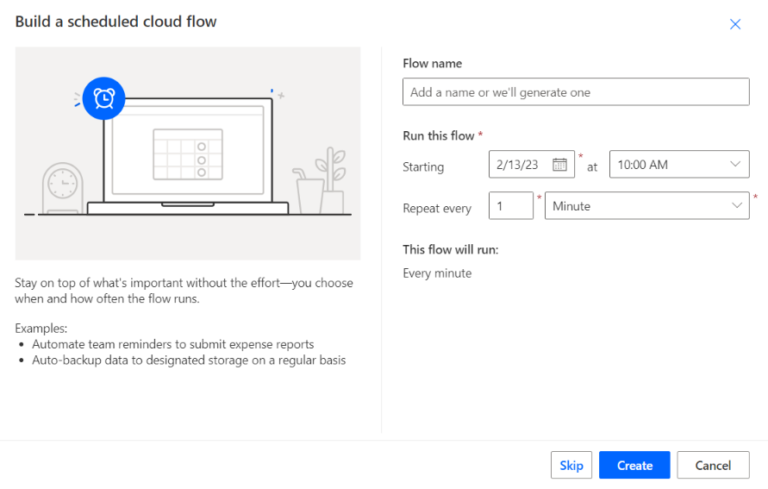
Scheduled cloud flows
With scheduled cloud flows, you can create an automation that runs upon a schedule. These flows run on a recurring schedule, such as daily, weekly, or monthly.
For example, daily or weekly upload of documents to SharePoint or a simple flow that sends a daily summary email to the team with the key highlights and updates.
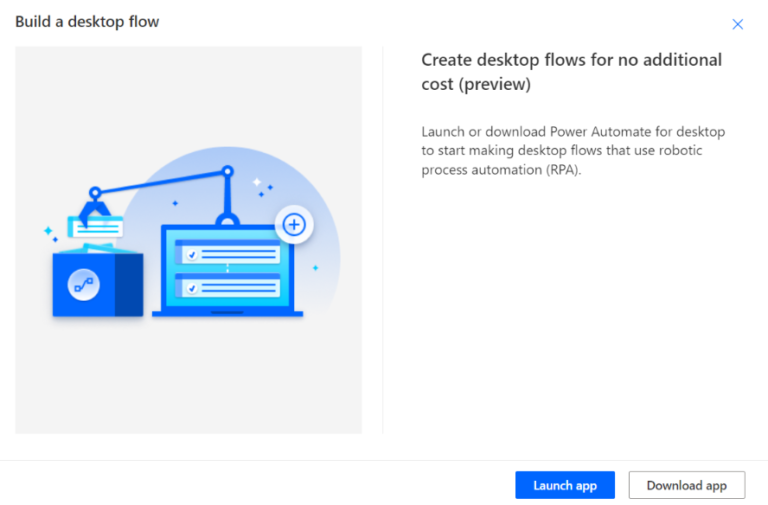
Desktop flows
Desktop flows in Power Automate are a type of flow that runs on a user’s local computer instead of in the cloud.
These flows allow users to automate tasks and processes that are performed on the desktop, such as moving files, opening and closing applications, or sending emails with the help of Microsoft Power Automate for Desktop.
Desktop flows expand the robotic process automation (RPA) functionality within Power Automate and provide the ability to automate all repetitive desktop-based processes.
Business process flows
Business process flows in Power Automate are a series of steps that automate a business process, reducing manual labor and errors, and increasing efficiency and consistency.
These flows automate business processes, such as customer onboarding, sales process, or purchase order approval.
How to create a Power Automate flow?
In Microsoft Power automate, there are three methods to launch a flow:
1. Start from a blank.
2. Use an existing template.
3. Pick a connector.
In the sections below, we will provide a detailed explanation of how to create a flow using a few examples.
Creating a cloud flow from scratch
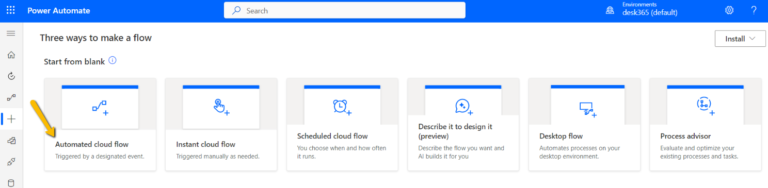
1. Sign into Power Automate.
2. Go to the ‘Create’ tab and select ‘Automated cloud flow’ option from blank.
3. Provide a name for the flow in the ‘Add a name or we’ll generate one field’.
4. Type Gmail in the ‘Search all triggers’ field.
5. Choose Gmail – When a new email arrives.
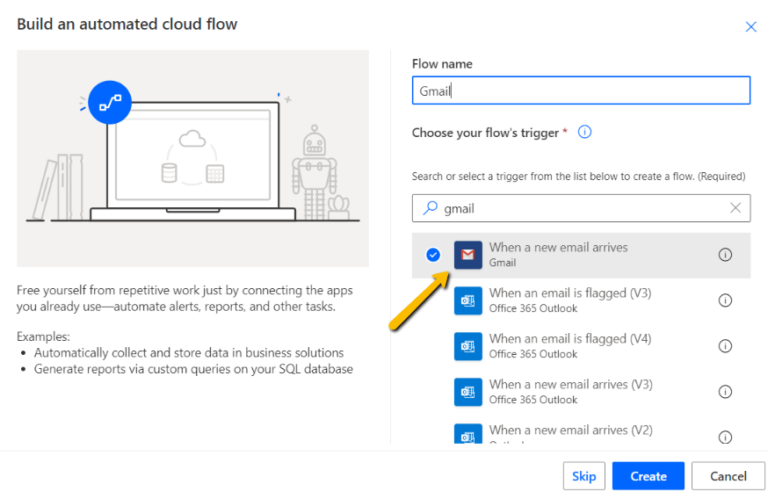
6. Click on the ‘Create’ button at the bottom of the screen.
7. If you haven’t already connected your Gmail account with Power Automate, select Sign into Gmail, and then enter your credentials.
Specify your action
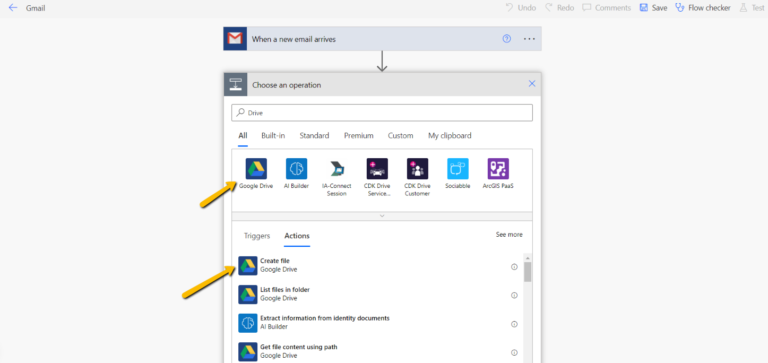
1. Select New step.

2. In the box that shows different Search connectors and actions, choose the one you’re looking for.
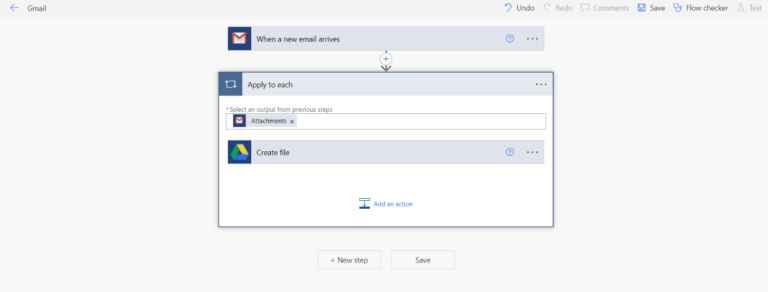
For this example, we’re looking to integrate Gmail and Google Drive so that each time an email arrives in your Gmail inbox, the attachments will automatically be saved to a folder in your Google Drive.
3. Select ‘Google Drive’ as the connector, and if prompted, choose the ‘Sign in to Google Drive’ option and enter your login credentials.
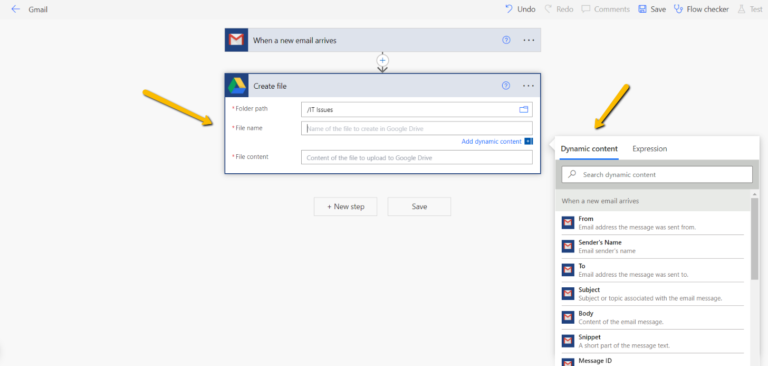
4. In the ‘Actions’ tab, choose the ‘Create file’ option.
5. Provide the necessary details such as ‘Folder path’, ‘File name’, and ‘File content’. You can also make use of the dynamic content for the email body, which can include the sender’s email, email subject line, and other customizable content to suit your requirements.
6. After doing the required steps, click on the ‘Save’ button to save the automation.
7. On the top bar, click Flow Checker to check for any errors or warnings. If there are none, proceed to the ‘Test’ option and send a test email to your Gmail address to see if the automation is working correctly.
8. To monitor the progress of your flow, go to “My Flows” and choose the flow you created. At the bottom, there will be a tab displaying the 28-day run history. If the status is marked as “succeeded,” then your flow has been working without any errors.
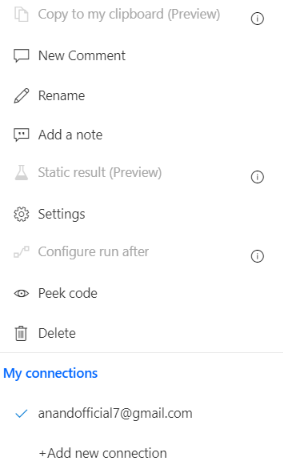
In Microsoft Power Automate, there is a feature called ‘Peek code’ that allows you to view and edit the underlying code or JSON representation of an action or flow in Power Automate.
When you use the ‘Peek code’ option, you can see the code that Power Automate is generating behind the scenes to automate your workflow.
This can be helpful if you want to make more advanced customizations to your flows, or if you want to learn more about how Power Automate works.
However, note that making changes to the code using ‘Peek code’ can be risky and should be done with caution, as any changes made to the code could potentially break the flow.
It is recommended that you have a good understanding of JSON and the structure of Power Automate flows before attempting to make changes using ‘Peek code’. It’s advisable to have a developer’s assistance when you use this option.
Creating a cloud flow from existing templates
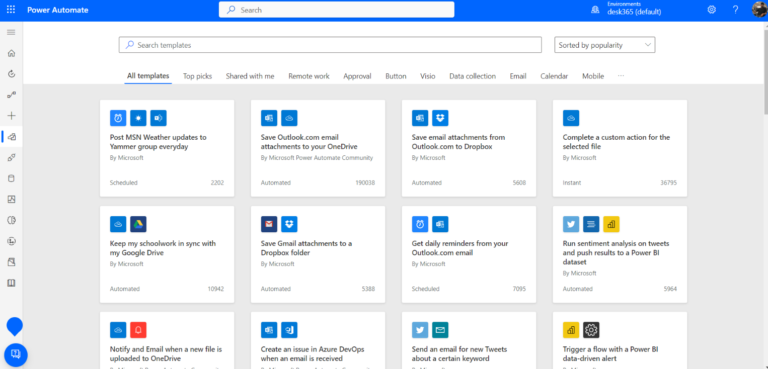
Microsoft Power Automate has a vast collection of templates.
For this example, we’ll create a flow using pre-existing templates such that whenever an email comes to your Outlook account, you will receive a notification in your Microsoft Teams ‘it-support’ channel.
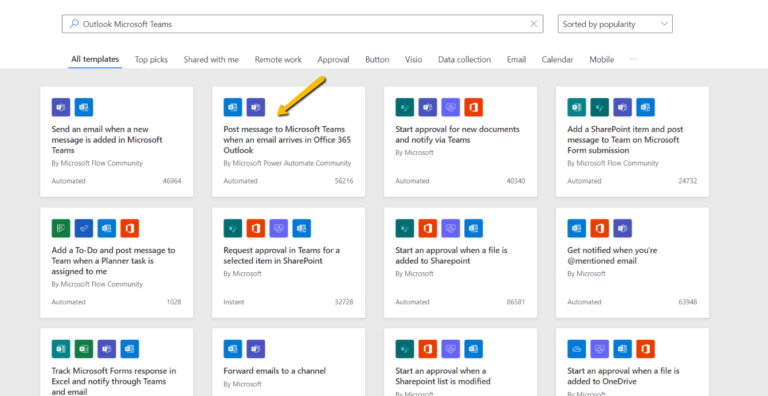
1. Sign into Power Automate, and then select Templates from the left-side navigation menu.
2.In the templates section, search for all available Outlook templates in Power Automate by entering ‘Outlook’ in the search box. Alternatively, you can search for templates related to both Outlook and Microsoft Teams by entering ‘Outlook Microsoft Teams’ in the search box.

3. If you haven’t already connected your Teams and Outlook account with Power Automate, you should sign into them, and then enter your credentials. Connect your accounts, and when two green ticks appear in front of the connectors, you can proceed to ‘Create Flow’.
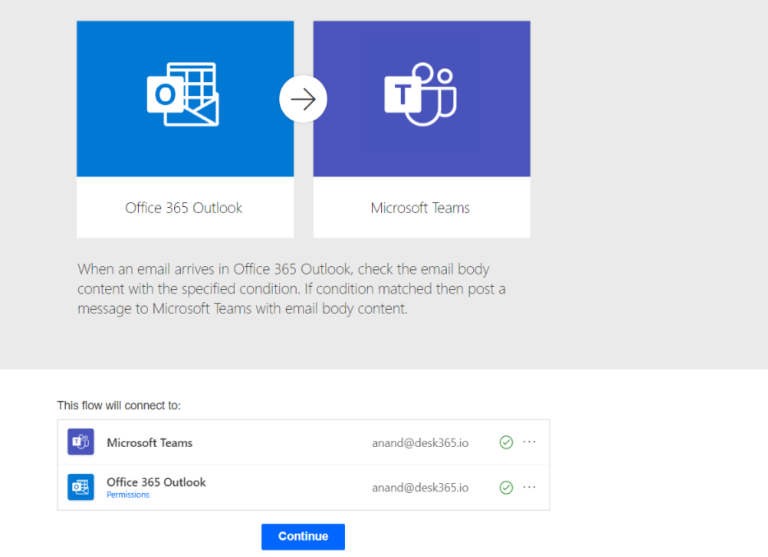
4. Select continue.
5. In the next screen, you’ll see the flow details on the screen. Click on the edit option to see the workflow.
6. Here, you can enter important information such as the Team ID, Channel information, and Message.
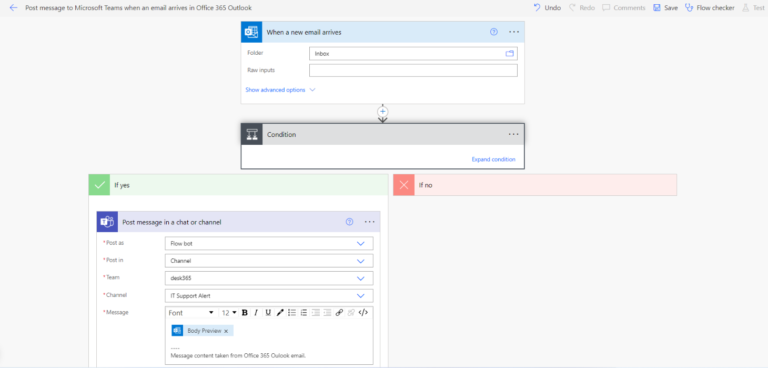
7. After doing all the required steps for ‘Yes’ and ‘No’ conditions, click on the ‘Save’ button to save the automation.
Once the flow is created, you can test it to ensure that it is functioning correctly.
8. On the top bar, click Flow Checker to check for any errors or warnings. If there are none, proceed to the ‘Test’ option and see if the automation is working correctly.
8. To monitor the progress of your flow, go to “My Flows” and choose the flow you created. At the bottom, there will be a tab displaying the 28-day run history. If the status is marked as “succeeded,” then your flow has been working without any errors.
Creating a cloud flow using Desk365 Connector
You can also create a cloud flow using a connector. For this example, we will see how to use the Desk365 connector and how to establish automated workflows connecting Desk365 with other third-party applications such as Asana.
1. Sign into Power Automate, and then select Connectors from the left-side navigation menu.
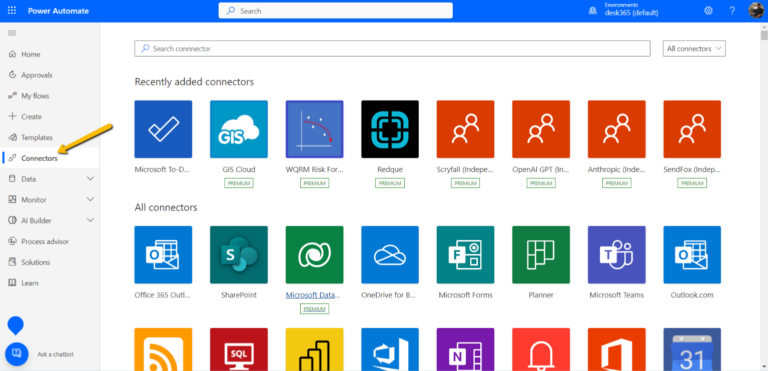
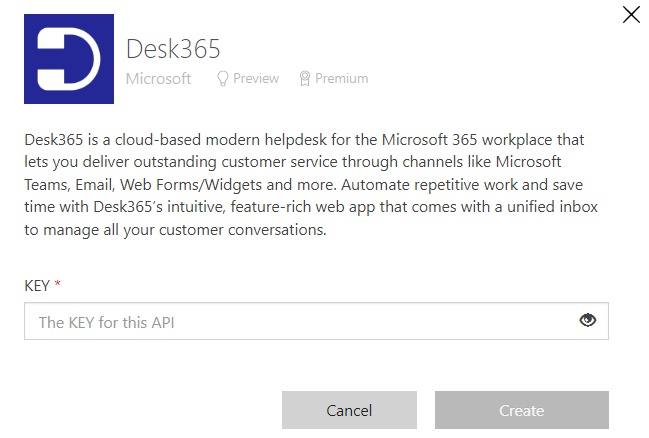
2. Go to the ‘Data’ menu and select the ‘Connections’ tab from the menu to view your existing connections or create a new one. If you haven’t yet connected the Desk365 connector, you can establish the connection by providing your API Key and clicking on the ‘Create’ button.
Once the connection is created, you will see it listed under the ‘Connections’ tab in Power Automate.
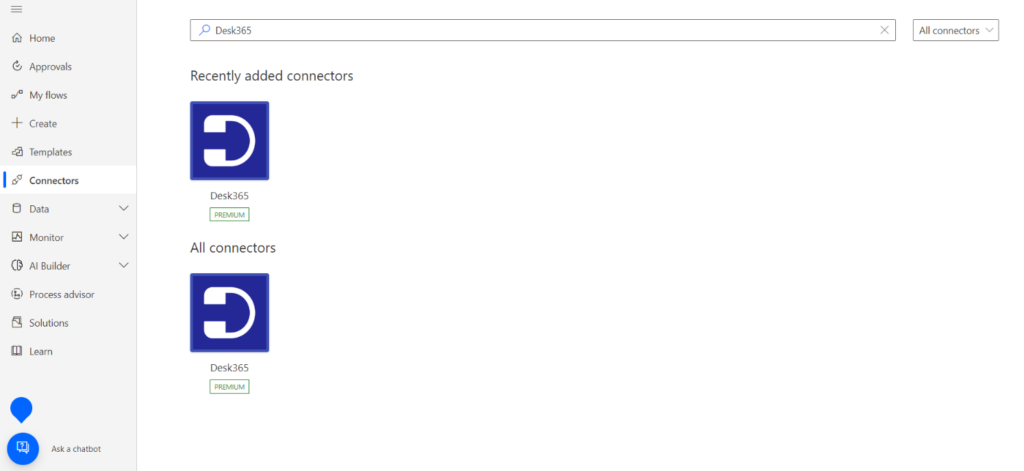
3. Navigate to the ‘Connectors’ tab and enter ‘Desk365’ in the search box and choose the Desk365 connector from the search results.
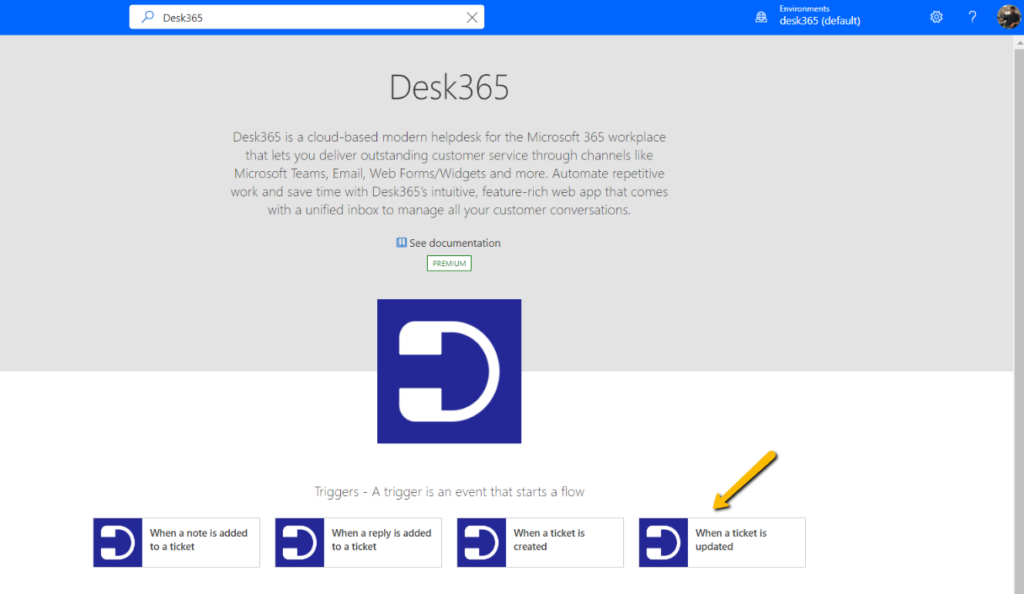
For this example, we’re going to add a task in Asana when a ticket is updated in Desk365. When a ticket status is changed to ‘Move to Asana’ in Desk365, a task gets added in Asana with the ticket details.
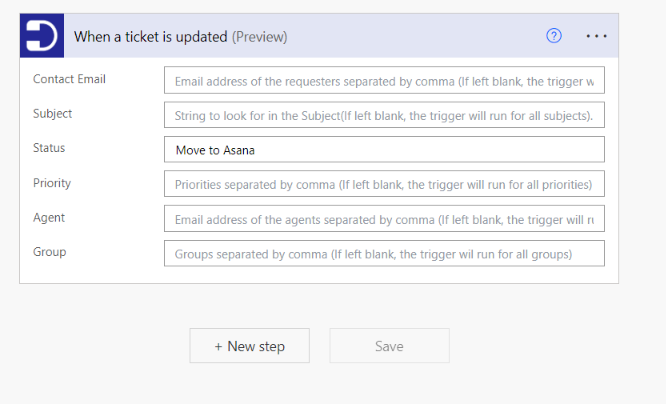
4. Select ‘When a ticket is updated’ trigger.
5. Enter ‘Move to Asana’ in the Status field of the trigger.
6. Click on ‘+ New Step’.
7. Enter Asana in the Search connectors and actions box.
8. Select ‘Create Task (V2)’ action.
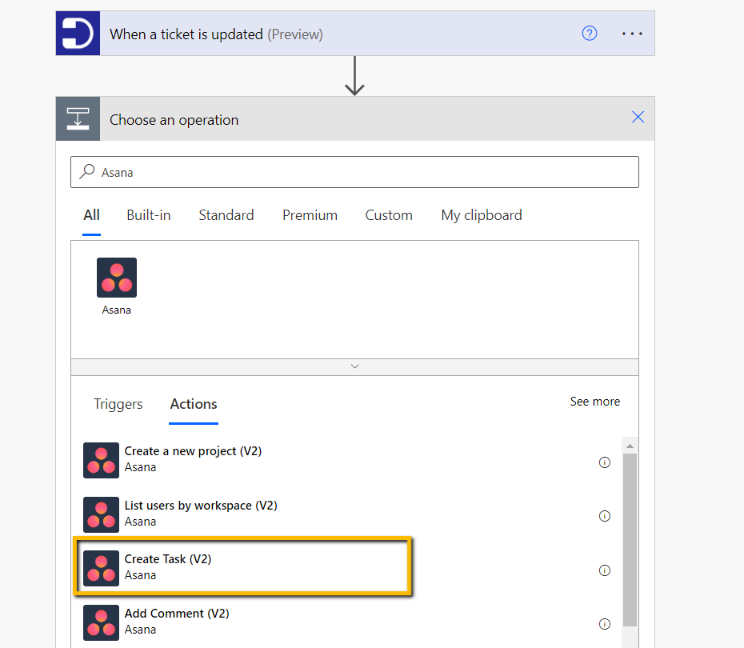
If you haven’t already connected to your Asana account, you should sign into them, and then enter your credentials.
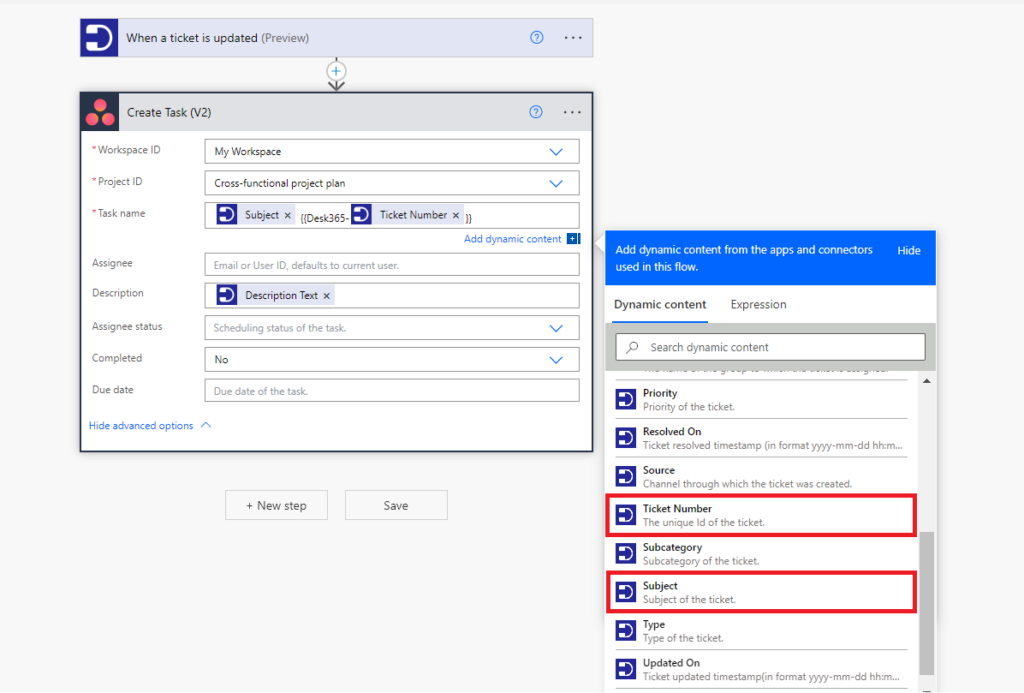
9. Enter your workspace ID and project ID.
10. Place the cursor in the ‘Task name’ field and select ‘Subject’ from the dynamic content and type ‘{{Desk365-‘ and then select ‘Ticket Number’ and type ‘}}’. Similarly, place the cursor in the description field and select ‘Description Text’ from the dynamic content.
11. Again, click on ‘New Step’ and enter Desk365 in the Search connectors and actions box.
12. Select ‘Update a ticket’ action. Place the cursor in the ‘Ticket Number’ field and select Ticket Number from the suggestions displayed.
13. Place the cursor in the ‘Status’ field and select ‘Moved to Asana’ from the dropdown (You need to create another status like ‘Moved to Asana’ by going to Settings > Admin > Ticket Fields in Desk365).

15. Click on the ‘Save’ button.
That’s it. Whenever a ticket is updated, and the status is marked as ‘Move to Asana’ in the ticket, a task gets created in Asana with the required details provided by the user.
Sign up for a 21-day free trial of Microsoft Teams Ticketing System and test out the Desk365 connector by creating your own cloud flows.
Who can use Microsoft Power Automate?
Power Automate is a tool that can be utilized by anyone, regardless of coding skills, to automate repetitive and rule-based tasks that were previously done manually. This means that both coders and non-coders can benefit from its capabilities to automate tasks, integrate data, and streamline business processes.
Microsoft Power Automate is designed for a wide range of users, including:
Business users
Power Automate provides an intuitive and user-friendly interface that makes it easy for business users to automate repetitive and time-consuming tasks, such as data transfer, email and message communication, document generation, and more. They can create workflows to streamline business processes and increase efficiency.
IT professionals
Power Automate provides IT professionals with a way to automate tasks such as provisioning users, managing SharePoint permissions, monitoring system alerts, integrating applications, and more, making it a useful tool for managing and maintaining the technology infrastructure of an organization.
Developers
Developers can use Power Automate to create custom workflows that integrate with various applications and services. They can use the Power Automate API to automate tasks such as creating new users in Active Directory, managing SharePoint lists, or triggering workflows based on custom events.
Teams
Power Automate can significantly enhance team productivity by automating time-consuming and repetitive tasks, freeing up team members to focus on more high-value work. Moreover, it can improve communication and collaboration among team members by providing real-time updates, notifications, and alerts, enabling team members to stay on top of their tasks and work together more seamlessly.
Freelancers
Freelancers often have to perform repetitive tasks, such as sending follow-up emails or invoices, which can be automated using Power Automate. It can integrate with a wide range of tools and services, such as Office 365, Trello, Asana, Dropbox etc. enabling freelancers to automate tasks across multiple platforms which helps freelancers save time and increase their productivity.
Power Automate is designed to be accessible to a wide range of users, regardless of technical proficiency, making it a versatile tool for organizations looking to automate their operations.
What are some drawbacks of using Microsoft Power Automate?
While Microsoft Power Automate offers many benefits, there are also some drawbacks to consider:
Cost
While Microsoft Power Automate provides a free plan, it has limited features, and users may need to upgrade to a paid plan to access premium features. The cost of the premium plan can be high for small businesses, and it may not be worth the investment if the business does not have a high volume of workflows.
Integration limitations
While Power Automate integrates with hundreds of Microsoft and third-party services, there may be limitations in terms of the data and functionality that can be integrated with certain systems.
Complex workflows
For more complex workflows, Power Automate may require a significant amount of time and effort to set up and maintain. Users may find it challenging to create workflows that involve multiple conditional statements or complex data manipulation. In such cases, they may require the assistance of a coding expert to develop more sophisticated workflows.
Dependence on external systems
Microsoft Power Automate is dependent on external services and applications to create workflows. If any of these services are unavailable or experience downtime, it may disrupt the workflow. Users need to ensure that they have a backup plan in place to mitigate the risk of disruption.
Challenging for first-time users
It has a lot of features and capabilities, which can be overwhelming for first-time users. It can take some time to learn how to use the tool effectively and efficiently. Automating complex workflows, debugging and error handling can be challenging, especially for users who are not familiar with programming concepts.
Need Office 365
The requirement of having an Office 365 subscription can be a limitation for some users who want to use Power Automate. This means that in order to use Power Automate, users must first have an Office 365 subscription, which can be an added cost for some organizations or individuals.
Potential security risks
Microsoft Power Automate connects with multiple services and applications, making it vulnerable to security risks. Users need to ensure that they configure the service correctly to prevent unauthorized access to sensitive data. Power Automate also stores data in the cloud, which may raise concerns about data privacy.
Data backup remains only for 30 days
The limitation of data backup staying for 30 days in Power Automate can be a concern for some users, particularly those who need to retain data for longer periods. This means that after 30 days, the data stored in Power Automate may be lost, unless users take action to preserve it.
Microsoft Power Automate offers several benefits, such as saving time and effort, simplifying complex and time-consuming processes, and increasing productivity. However, it also has some drawbacks, including potential security risks, dependency on external services, and more. Before incorporating Microsoft Power Automate into their business operations, users should carefully consider these potential drawbacks.
How much does Power Automate cost?
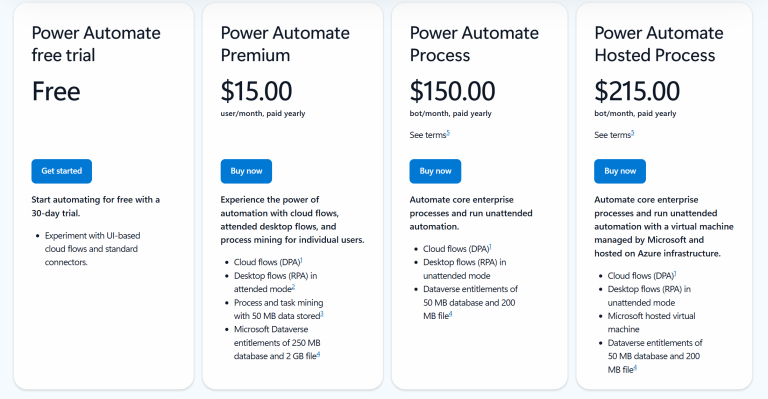
Power Automate pricing depends on the type of automation you need. As of 2026, the structure is much simpler than it used to be, built around what’s included with Microsoft 365, plus two main standalone plans and a hosted option.
1. Included with Microsoft 365. If your organization has a Microsoft 365 Business or Enterprise license, Power Automate is already included, but limited to basic cloud flows using standard connectors only (Outlook, Teams, SharePoint, and similar). This covers a lot: email processing, approval workflows, and SharePoint automation work perfectly on the included tier, so many users never need to upgrade.
2. Premium – $15 per user/month. The entry point for going beyond what’s bundled with Microsoft 365. It unlocks unlimited cloud and desktop flows in attended mode, premium connectors like Salesforce, SAP, and HTTP, AI Builder credits, and Dataverse storage. One thing to know: the Premium license is per user, so if a flow you build runs on behalf of other people and processes their data, those users may need their own licenses too.
3. Power Automate Process – $150 per bot/month. Built for unattended automation, workflows that run in the background without a human in the loop. It’s priced per bot rather than per user, which makes it more cost-effective for high-volume processes like overnight invoice processing or scheduled data migration.
4. Hosted Process – $215 per bot/month. Adds cloud-hosted infrastructure to the Process plan, so you don’t need to maintain your own machine to run unattended bots.
Beyond these, add-ons like AI Builder and Process Mining are available for more advanced needs. A 30-day free trial is available to test cloud flows and standard connectors before committing. You can find current details on the Microsoft Power Automate pricing page.
Conclusion
Power Automate is an incredibly powerful tool that can help automate repetitive tasks and streamline workflows. With its user-friendly interface and extensive library of pre-built connectors, anyone can start automating their work processes with Power Automate.
This beginner’s guide has covered the fundamentals of Power Automate, including how to create flows, connectors, and triggers.
Users can create workflows quickly and efficiently by following the best practices outlined in this blog post. And with the ability to troubleshoot and debug workflows, users can ensure that their automated processes are running smoothly and efficiently.