


Are you thinking about using Power Automate as your ticketing system? That’s a solid choice if you’re looking to save time and streamline your processes.
Managing support tickets manually can get chaotic really quickly. Missing tickets, delayed responses, and the back-and-forth between teams can leave both your agents and customers frustrated. And that’s not even taking in to account all the extra hours spent trying to track everything.
Here’s where Power Automate comes in. It’s not a full-on ticketing system like Zendesk, Desk365, or Freshdesk, but it can definitely handle a lot of the heavy lifting. Imagine setting up workflows that automatically assign tickets, send updates to customers, and track everything without you lifting a finger. It’s all about getting those tickets where they need to go, fast and efficiently.
If you’re tired of the manual grind and looking for a way to automate your ticketing process, Power Automate could be the game-changer you need.
What is Power Automate ticketing system?
Microsoft Power Automate is basically Microsoft’s way of letting everyday teams automate routine work without building a full software system. Think of it as a tool that watches for something to happen, then takes the next steps for you. For example: “When a form is submitted, create a record, notify the team, ask for approval, and update the status.” That trigger-and-action model is how Microsoft itself describes cloud flows.
Instead of someone manually doing:
“Check inbox → copy details into Excel or SharePoint → message the manager → wait for approval → send an update,”
Power Automate can do most of that sequence automatically across Microsoft 365 and other connected apps. Microsoft describes it as an online workflow service for automating actions across common apps and services, including notifications, data collection, and file or record updates.
What makes it useful is that it is low-code. That means you usually don’t sit down and write a program from scratch. You pick a trigger, add actions, connect apps, and define simple logic like conditions, approvals, loops, or updates. Microsoft’s current guidance describes Power Automate as a low-code experience with many connectors and an interface designed for building workflows with little to no coding.
A simple way to understand it is:
- Trigger: something happens
- Action: Power Automate responds
- Flow: the full sequence of steps
Example:
- Trigger: a customer fills out a support form
- Actions: create a ticket in SharePoint, send a Teams message, assign it to someone, and email the customer
That pattern lines up Microsoft’s documented Forms, SharePoint, Teams, and approval capabilities.
How to set up a ticketing system using Microsoft Power Automate?
Here’s a step-by-step guide to set up a ticketing system using Microsoft Power Automate with a simple Microsoft 365 stack:
- Microsoft Forms for ticket intake
- SharePoint / Microsoft Lists for storing tickets
- Power Automate for automation
- Outlook / Teams for notifications
This setup matches Microsoft’s documented building blocks: cloud flows use a trigger + actions, Forms supports when a new response is submitted, and Get response details, and SharePoint provides list triggers like ‘When an item is created’ and ‘when an item is created or modified.’
What you’ll build
A user submits a ticket form. Power Automate creates a ticket in SharePoint, generates a ticket number, sends a confirmation email, assigns the ticket, and notifies the support team. Later, when the ticket status changes, more notifications go out automatically. This pattern is consistent with Microsoft’s SharePoint + Power Automate guidance.
Before you start
You need:
- A Microsoft 365 account with access to Forms, SharePoint, or Microsoft Lists, Power Automate, and Outlook/Teams
- Permission to create a SharePoint list and flows
- A support mailbox or team email if you want centralized alerts
Step 1: Create the ticket list in SharePoint
Create a SharePoint list called Support Tickets.
Add these columns:
- Title — Single line of text
- Description — Multiple lines of text
- Requester Name — Single line of text
- Requester Email — Single line of text
- Category — Choice
- Priority — Choice
- Status — Choice
- Assigned To — Person or Group
- Ticket ID — Single line of text
- Created On — Date and Time
- Updated On — Date and Time
- Resolution Notes — Multiple lines of text
- Closed On — Date and Time
Recommended Status values:
- New
- Assigned
- In Progress
- Waiting on User
- Resolved
- Closed
Why this matters: SharePoint list items are what Power Automate will create and update, and Microsoft documents list-based triggers specifically for created and modified items.
Step 2: Create the intake form in Microsoft Forms

Create a form called IT Support Request or Help Desk Ticket.
Suggested fields:
- Issue title
- Description
- Category
- Priority
- Your name
- Your email
Power Automate supports the normal Forms pattern of:
- When a new response is submitted
- Get response details

Step 3: Create Flow 1 — New Ticket Intake
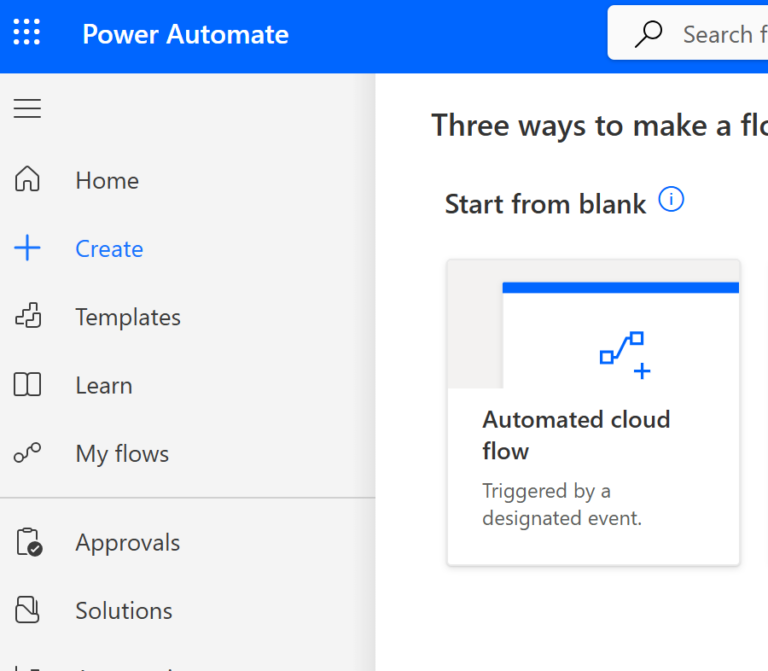
Open Power Automate.
Go to:
My flows → New flow → Automated cloud flow
That is Microsoft’s documented path for creating an automated cloud flow.
Name the flow:
Create Ticket from Form
Choose the trigger:
Microsoft Forms — When a new response is submitted
In the trigger:
- Select your form in Form Id
Then add:
Microsoft Forms — Get response details
Configure it like this:
- Form ID = your same form
- Response Id = dynamic content: Response Id
That exact pair of steps is the standard Forms setup in Power Automate.
Step 4: Add SharePoint “Create item”
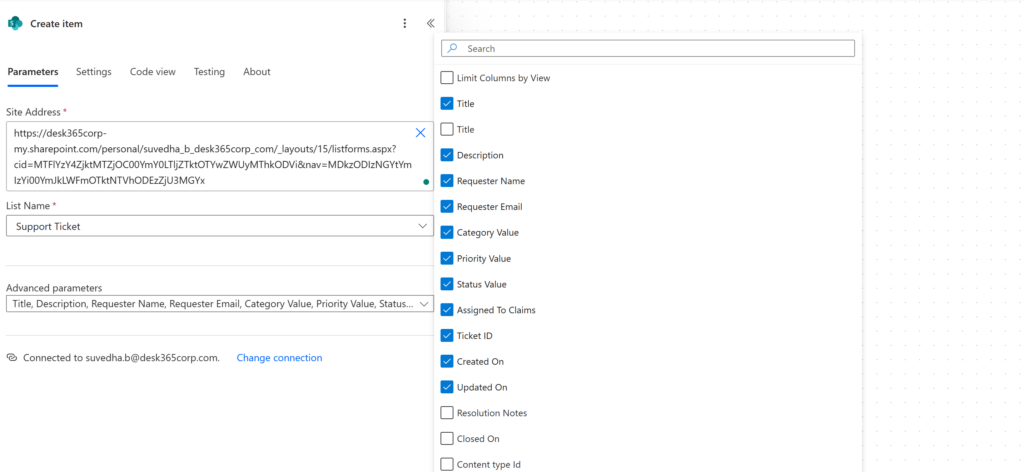
Add a new action:
SharePoint — Create item
Set:
- Site Address = your SharePoint site
- List Name = Support Tickets
Map the fields:
- Title → Issue title
- Description → Description
- Requester Name → Name
- Requester Email → Email
- Category → Category
- Priority → Priority
- Status → New
- Created On → current time
- Updated On → current time
At this point, every form submission creates a new ticket record in the SharePoint list. SharePoint actions and triggers are a standard part of Power Automate’s SharePoint integration.
Step 5: Generate a ticket number
After Create item, add:
SharePoint — Update item
Use the ID returned by Create item to update the same record.
Set Ticket ID to something like:
concat(‘TCK-‘, formatDateTime(utcNow(),’yyyy’), ‘-‘, outputs(‘Create_item’)?[‘body/ID’])
Example output:
TCK-2026-104
Also keep:
- Updated On = utcNow()
This gives every ticket a readable, unique support reference.
Step 6: Send a confirmation email to the requester
Add:
Office 365 Outlook — Send an email (V2)
Set:
- To = Requester Email
- Subject = Your ticket has been created: + Ticket ID
- Body = include ticket summary
Example email body:
Hello,
Your support ticket has been created.
Ticket ID: [Ticket ID]
Title: [Title]
Priority: [Priority]
Status: New
We’ll update you as work progresses.
This is one of the most common Forms-to-email scenarios for Microsoft documents.
Step 7: Create Flow 2 — Assignment and routing
Create a second flow:
My flows → New flow → Automated cloud flow
Name it:
Assign Ticket
Choose the trigger:
SharePoint — When an item is created or modified
This trigger fires whenever a list item is created or changed. Microsoft explicitly documents that behavior.
Important
This trigger runs on every modification, so you should prevent unnecessary runs with trigger conditions or careful logic. Microsoft notes that when an item is created or modified fires for every change, and trigger conditions can reduce unwanted runs.
Add routing logic
Add a Condition.
Example routing rules:
- If Category = Hardware → assign to IT Ops
- If Category = Software → assign to App Support
- If Priority = High → assign to escalation lead
Microsoft documents Condition as the standard way to branch behavior in a cloud flow.
In the matching branch
Add:
SharePoint — Update item
Set:
- Assigned To = chosen user
- Status = Assigned
- Updated On = utcNow()
Then add:
Send an email (V2) to the assigned technician or support mailbox.
Example subject:
New assigned ticket: TCK-2026-104
Step 8: Add a Teams notification
For better visibility, add a Teams notification after assignment.
You can either:
- post a simple channel message, or
- use an adaptive card for a richer ticket summary
Microsoft documents Power Automate support for posting adaptive cards in Teams, and also explains that adaptive cards are a structured, actionable UI format.
A good Teams card/message should show:
- Ticket ID
- Title
- Priority
- Category
- Assigned To
- Link to the SharePoint item
Step 9: Add approvals for special ticket types
For tickets like:
- software access requests
- hardware purchases
- permission changes
add:
Start and wait for an approval
Approvers can respond from Outlook, Teams adaptive cards, or the Power Automate approvals experience. Microsoft documents those approval response options directly.
Typical logic:
- If approved → continue ticket processing
- If rejected → set status to Closed or Rejected and notify requester
Step 11: Test the whole system
Run one real test from end to end:
- Submit a sample form
- Confirm the SharePoint item gets created
- Confirm Ticket ID is generated
- Confirm requester gets email
- Confirm assignment happens
- Confirm Teams/email notification is sent
- Change status in SharePoint and verify requester updates
What are the limitations of using power automate as a ticketing system?
1. Limited customization for complex workflows
While Power Automate provides robust automation, its customization options for complex workflows are often limited compared to dedicated ticketing systems like Zendesk, Desk365, or ServiceNow. Customizing tickets with advanced rules, conditionals, and ticket routing logic requires significant effort and isn’t as user-friendly as specialized systems.
2. Scalability issues
Power Automate can struggle when handling a large volume of tickets due to its reliance on cloud flows that can be throttled or limited by Microsoft’s API restrictions.
3. Steep learning curve
For users without technical backgrounds, setting up Power Automate for ticketing purposes can be challenging. It is a platform designed more for automating business processes rather than streamlining ticket management.
4. Limited reporting and analytics
Power Automate lacks the detailed reporting and analytics capabilities that dedicated ticketing systems like Freshdesk or Desk365, Zendesk provide out of the box. Companies using Power Automate for ticketing may need to integrate additional tools for comprehensive reporting.
5. Integration challenges
While Power Automate is excellent for integrating within the Microsoft ecosystem, it can face integration difficulties with non-Microsoft tools. Many organizations rely on third-party software for support and communication, and Power Automate’s integration with those systems isn’t as seamless as it is with Microsoft products.
6. No built-in customer support features
Unlike dedicated ticketing systems, Power Automate does not come with built-in features like customer portals, knowledge bases, or chatbots. This requires teams to manually integrate third-party solutions to fill those gaps.
7. Reliability concerns for critical support
While Power Automate can automate ticket assignments and notifications, it may not be reliable enough for mission-critical customer service environments. Its performance can be inconsistent, especially when handling large numbers of tickets or requiring real-time responses.
8. Dependency on the Microsoft ecosystem
For organizations not already using Microsoft’s suite of products (like Office 365, SharePoint, etc.), using Power Automate can create additional complexity and might not be worth the investment.
9. Lack of advanced ticket routing
Power Automate lacks the sophisticated ticket routing systems that dedicated ticketing software offers. While it can route tickets based on basic conditions, it doesn’t have the level of advanced intelligence, like AI-based categorization and priority assignment, that dedicated ticketing systems offer.
10. Risk of over-automation
With Power Automate, over-automating processes without proper checks could lead to errors in ticket handling. If the workflows aren’t properly configured, tickets may be miscategorized or automatically closed without adequate resolution.
Explore cloud-based ticketing systems
If your team is growing or you’re dealing with more and more support requests, it might be time to consider using a dedicated ticketing system. While Power Automate can help automate some workflows, it doesn’t always have the depth or the features that a tool built specifically for support can offer.
A ticketing solution like Desk365 is designed to make managing support tickets easier. It helps you track tickets efficiently, manage SLAs, automate workflows, and even provides built-in analytics. Plus, with plans starting at just $12, it’s a cost-effective option for teams looking to streamline their process.
Using a dedicated ticketing system means you can handle tickets more smoothly, avoid missing important requests, and give your team the tools they need to respond faster and more effectively. It’s not just about organizing tickets; it’s about improving how your team works and ensuring your customers get the support they need promptly.
Omni-Channel
- Microsoft Teams Ticketing
- Email Ticketing
- Customer Support Portal
- Web Form/Web Widget
- Unified Inbox
Process Automation
- Workflow Automation
- Multiple Business Hours
- Custom Response Templates
- Canned Responses
- Tasks/To-do Lists
- 'Share To' Tickets
- Time Tracking
- SLA Management & Business Hours
- SLA Reminders & Escalations
- Multiple SLAs
- SLAs in Automations
Data & Analytics
- Customer Surveys & Reports
- Ticket Trend Reports
- Productivity/SLA Reports
- Export Data
- Scheduled Reports
- Import Data
Ticket Management
- Round Robin Ticket Assignments
- AI Copilot
- AI Agent
- Multilingual Helpdesk
- Multiple Business Hours
- Load Based Ticket Assignments
- Ticket Watchers
- Multiple Groups/Departments
- Collision Detection
- Scheduled Ticket Creation
- Closure Rules
- Knowledge Base
- Contact Management
Integrations
- Entra ID Single Sign-on
- Microsoft Entra ID Sync
- API Access
- Web-hooks
- Power Automate Connector
- Microsoft 365 Copilot Plugin
Customization
- Custom Email Servers
- Custom Domain
- Custom Ticket Fields
- Custom Forms
- Custom Roles
- Custom Reports & Graphs
- Remove Desk365 Branding
Support
- Free Setup and Installation
- Priority Support
Service Management
- Asset management
- Change management
Advanced Encryption
- PII and PHI Controls
- Data Redaction
- HIPAA Compliance
- Audit Logs
Switch to Desk365 Starting at just $12/month
Frequently asked questions
While Power Automate can automate parts of a ticketing process, it is not a dedicated ticketing system. It is better used for automating workflows, such as routing tickets, assigning tasks, or sending notifications. You’ll need to integrate it with other tools, like Microsoft Teams or SharePoint, to manage tickets effectively. For a full-fledged ticketing solution, you may need a more comprehensive platform.
Power Automate is not a full-featured ticketing system and has limitations in areas such as reporting, advanced ticket routing, and customer-facing portals. It requires a lot of manual configuration and may not scale as easily as a dedicated ticketing system. For large teams or complex ticketing needs, a specialized system may be a better fit.